Yes, you can convert a regular skateboard into an electric skateboard—and it’s easier than you might think. With the right parts and a bit of patience, you can turn your manual setup into a motorized ride without buying a brand-new board. This guide walks you through everything: why you might want to do it, what you need, how to make it happen, and what to watch out for.

Why Convert a Regular Skateboard into an Electric One?
Converting a regular skateboard into an electric skateboard can be a smart and rewarding project, especially if you’re looking to save money and create something customized to your style. Buying a prebuilt electric skateboard often costs hundreds or even thousands of dollars, which isn’t practical for everyone. If you already have a sturdy regular skateboard, converting it allows you to reuse what you own and simply add the electric components you need—like a motor, battery, controller, and remote.
Beyond saving money, a DIY conversion gives you total control over the ride. You can build for speed, range, or comfort depending on your preferences. Want more torque for hills? Choose a powerful belt-drive system. Prefer quiet cruising? Go with hub motors. Need more distance on a single charge? Install a larger battery pack. Unlike store-bought boards that come with fixed specs, a DIY build lets you shape the final product to match how and where you actually ride.

Is Your Regular Skateboard a Good Fit for Conversion?
Not every regular skateboard is ideal for conversion, but many are. Before you shop for parts, take a quick look at what you have:
Deck Type: Stiff decks are best because they support the battery enclosure without flexing too much. A flexible deck can stress the wiring and possibly crack the casing over time.
Truck Compatibility: Most motor mounts are designed for specific trucks—especially Caliber II or Paris-style trucks. If your trucks are too unique or narrow, you might need to replace them.
Undercarriage Space: You’ll need enough space under the board to attach the battery, ESC (electronic speed controller), and wiring safely without scraping the ground.
Quick Tip: Top-mount decks are better than drop-through for DIY setups. They give you more ground clearance and flexibility with enclosure placement.
What Parts Do You Need to Convert a Skateboard?
Core Components
To electrify your skateboard, you’ll need the following essentials:
-
Motor: You can choose between hub motors (quiet, integrated in the wheels) or belt drive motors (more torque and customizable).
-
ESC (Electronic Speed Controller): This controls how the motor responds to throttle input from your remote.
-
Battery Pack: Usually lithium-ion. You’ll see specs like 10s2p or 12s3p, which determine the voltage and capacity.
-
Remote Control: Used to throttle, brake, and change modes.
-
Enclosure: This houses and protects the battery and ESC from debris, water, and impacts.
Supporting Parts & Accessories
-
Motor Mounts: These attach the motor to your trucks.
-
Pulleys & Belts: Needed for belt-drive setups to connect motor to wheels.
-
Power Switch: Usually anti-spark, so you don’t fry your ESC when turning on.
-
Wiring Harness & Connectors: XT60/XT90 connectors, bullet plugs, sensor wires, etc.
-
Charger: Must match the voltage of your battery (e.g., a 42V charger for a 10s battery).

How to Convert Your Regular Skateboard — Step by Step
Step 1: Plan Your Build Based on Your Ride Goals
Before grabbing any tools, take a moment to plan your setup. Are you aiming for short daily commutes, weekend joyrides, or long-distance travel? Do you live in a flat neighborhood or somewhere with steep hills? Your answers will directly shape what components you'll need.
If you're after simplicity, you might go for a hub motor setup, which installs inside the rear wheels and has fewer external parts. If you want more torque, better cooling, and easy gear ratio changes, a belt drive system is the better option—though it’s slightly more complex to install. Decide whether you want single or dual motors based on how much power you need (dual for hills or heavier riders). Then, consider your battery size: larger packs give more range and power, but they’re heavier and bulkier to mount.
📌 Pro Tip: Use online calculators to estimate how your chosen motor and battery combo will affect top speed, range, and hill performance.
Step 2: Mounting the Hardware to the Board
Now that you have your parts, it's time to start the physical modifications. Begin by flipping your board over and identifying where each component will go. You’ll need to:
-
Attach the motor mount to the rear truck hanger. This usually involves clamping it around the truck using bolts or a tension plate. Make sure it’s aligned straight and tight. Add a layer of grip tape or rubber between the mount and hanger to prevent slippage, and use threadlocker to stop bolts from loosening over time.
-
Install the motor itself (belt or hub). For belt drives, you’ll also install a pulley onto your rear wheel (either by bolting through it or using a press-fit design), then wrap the timing belt around both the motor pulley and wheel pulley. Rotate the wheels by hand to check for smooth movement and correct alignment.
-
Fit riser pads or wheel spacers if needed to avoid wheel bite or scraping from the mounted hardware. These can also provide extra clearance for thicker enclosures.
Important: Some trucks, especially off-brand or narrow ones, may not be compatible with standard motor mounts. You may need to upgrade your trucks to Caliber II or Paris styles for reliable fitment.
Step 3: Wiring and Securing the Electronics
Once the mechanical components are mounted, the next phase is wiring everything together safely and neatly. Here's what most users do:
-
Connect the motor phase wires to the ESC (Electronic Speed Controller). If you're using a VESC or programmable ESC, make sure the hall sensor wires (if applicable) are also plugged into the correct port.
-
Wire the ESC to the battery, ensuring you observe the correct polarity and connector type (XT60, XT90, etc.). It’s common to add an anti-spark switch or loop key in-line to avoid voltage surges when powering on.
-
Fit the ESC and battery pack into a plastic or fiberglass enclosure, ideally padded with foam or vibration-resistant mounts. Secure the enclosure to the underside of your deck using threaded inserts or wood screws with rubber washers to reduce cracking.
-
Route wires through grommets in the enclosure, and use zip ties, Velcro straps, or 3D-printed brackets to secure excess cable lengths and keep everything tight and clean. Apply gasket tape or silicone sealant to seal the edges of the enclosure from moisture.
Optional: If your battery doesn’t have an integrated Battery Management System (BMS), install one inside the enclosure to monitor charging and protect against overcurrent or under-voltage.
Step 4: Test the System and Fine-Tune Your Settings
Now it’s time to fire up the board. Start by:
-
Powering everything on and pairing your remote to the ESC. Most remotes have a bind button that syncs with the receiver automatically.
-
If you’re using a VESC-based controller, connect it to a computer via USB and run motor detection in the VESC Tool. This step calibrates motor behavior and ensures smooth acceleration and braking.
-
Test the brakes and throttle response in a safe, open area. Avoid high speeds until you’ve confirmed everything is operating correctly. Listen for grinding, belt slip, or motor cogging.
-
Adjust your settings as needed—many VESC remotes allow tuning throttle curves, acceleration ramps, and brake strength directly from the controller.
-
After a few rides, check all bolts for tightness, especially the motor mount and pulley connections. Vibration from riding can loosen hardware over time.
Post-build, charge your battery fully and monitor voltage levels. Use a smart charger when possible to avoid overcharging or unbalanced cells.

What to Watch Out For
Battery Safety
-
Only use batteries with a built-in BMS (battery management system).
-
Never charge unattended or with mismatched chargers.
-
Store your battery in a fire-safe bag when not in use.
Water Resistance
-
Your DIY board likely isn’t waterproof out of the box.
-
Use gasket tape around the enclosure and seal gaps with silicone.
-
Never submerge or ride in heavy rain unless you've weatherproofed everything.
Legal Considerations
-
In many cities, electric skateboards aren’t allowed on sidewalks.
-
Speed limits and helmet laws vary by region—check local laws before riding.
Overheating
-
Long rides or steep hills can cause your ESC or motor to overheat.
-
If you feel performance drops, let the board cool down.
Want to Make the Process Easier? Try the Cyber Electric Skateboard Kit from Maxfind
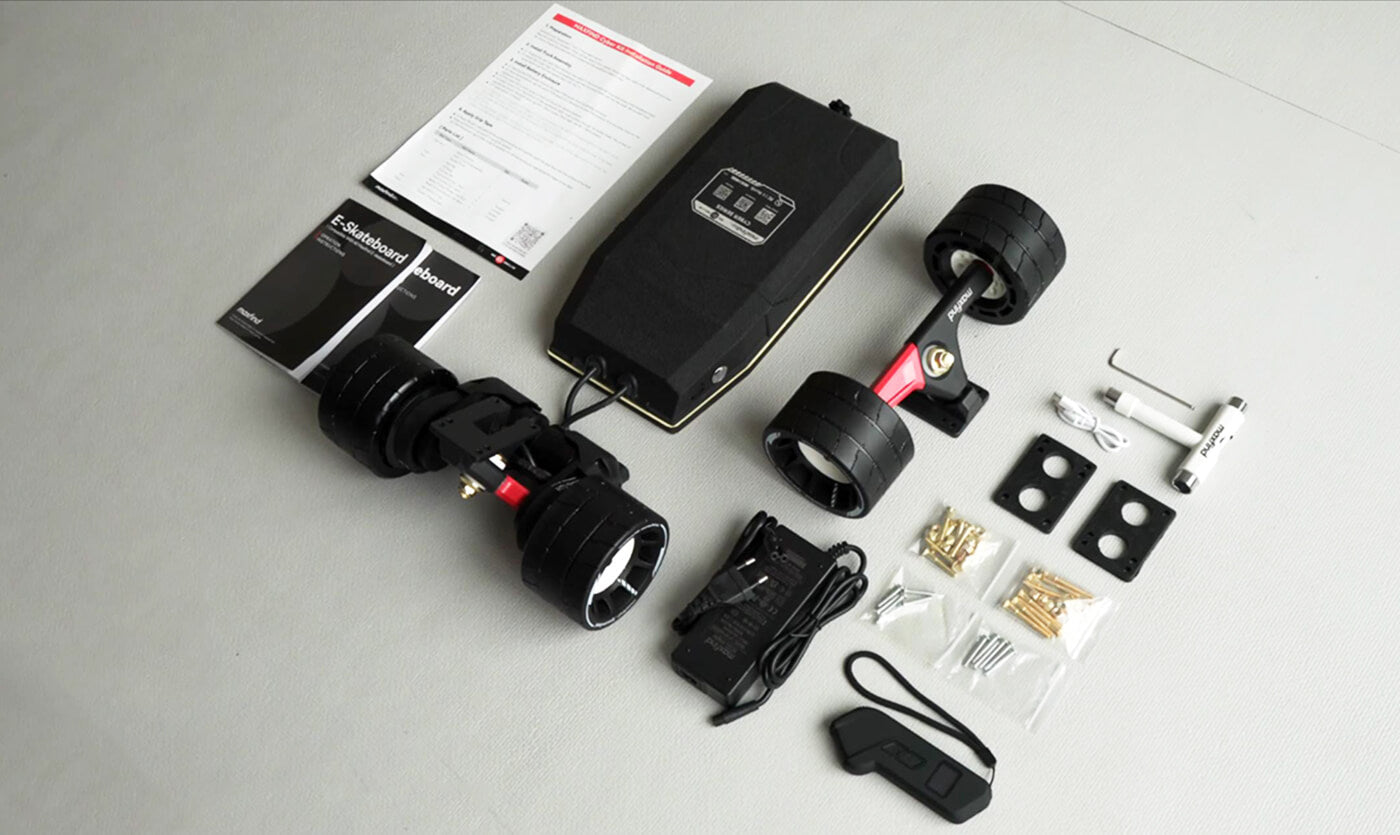
If you’re excited about converting your regular skateboard into an electric one but unsure where to start with all the separate parts, Maxfind’s Cyber Electric Skateboard Kit offers a simple, powerful, and commuter-ready solution. Designed specifically for DIY electric skateboard conversions, this kit includes everything you need to get rolling—without the stress of piecing together compatible components.
This all-in-one electric skateboard conversion kit is ideal if you're aiming to upgrade your current board into a daily commuter or weekend cruiser. It includes a high-performance hub motor system, a reliable ESC, a powerful swappable battery pack, and a wireless remote—all engineered for smooth integration, high efficiency, and minimal setup hassle.
Why Choose the Maxfind Cyber Kit?
-
Plug-and-Play Design: The Cyber Kit is beginner-friendly and requires no soldering, making it perfect for those who want a quick install with professional results.
-
Swappable Battery System: Extend your range instantly by swapping batteries in seconds—great for long commutes or back-to-back rides.
-
Universal Compatibility: The motor and mounting system are compatible with most regular skateboard decks, so you can convert your current ride without buying a new one.
-
Strong Performance: With a top speed of up to 26 mph and solid hill-climbing power, the Cyber Kit turns your old deck into a serious electric machine.
-
Water-Resistant Build: Engineered for real-world use, the components are sealed and durable—ideal for light rain or splashy streets.
Whether you’re a first-time builder or just want to avoid the trial-and-error of sourcing individual parts, the Cyber Kit from Maxfind makes converting your board fast, safe, and fun.
Check it out here and get started on building your own electric skateboard today.
Common First-Time Questions
Can I convert without soldering?
Yes. Many kits now use plug-and-play connectors, so no soldering iron is needed.
How long does it take?
Expect 2 to 6 hours, depending on your familiarity and whether you need to drill new holes or adjust parts.
Is it really safe?
As long as you follow wiring diagrams, use a proper battery with BMS, and check your setup before riding, yes—it’s safe for everyday use.
Should You Try It?
If you love DIY projects, already own a decent regular skateboard, and want an affordable way to enjoy the thrill of electric skateboarding, converting your board is totally worth it. With a little research and a few tools, you can build a ride that’s personalized, powerful, and way more fun than kicking around.
Whether you're commuting to school, running errands, or just cruising for fun, your DIY electric skateboard could be your next favorite project—and ride.
More Reading: FAQ for Beginners on Electric Skateboards


Share:
What Is a 2-in-1 Electric Skateboard?
How to know if you are a Goofy or Regular Skateboarder?